

You’ve ordered the brisket, the big day arrives, and suddenly you’re staring at lukewarm meat wondering how to save your catering experience. Most caterers arrive 1-2 hours before service to set up equipment, reheat proteins to safe temperatures, and arrange the complete spread before guests arrive. The difference between dried-out disappointment and tender perfection often comes down to technique, not talent.
Professional catering runs on precision timing that most clients never see. From the moment the delivery van pulls up to when the first guest grabs a plate, every step follows a careful sequence. Temperature control, moisture retention, and proper resting periods separate amateur reheating from restaurant-quality results.
The methods matter more than most people realize. Choosing the wrong approach can turn premium brisket into expensive shoe leather, while the right technique preserves that smoke ring and bark you paid for. Small decisions about slicing, wrapping, and heat application create dramatically different outcomes on your buffet line.
Common Reheating Mistakes and Their Consequences
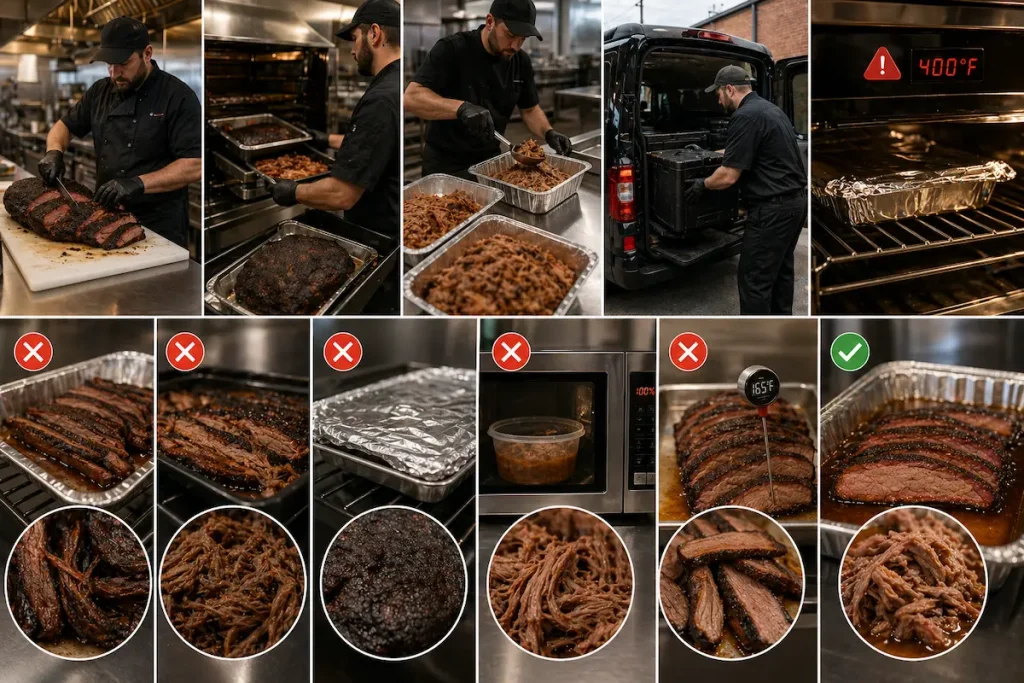
Cranking the oven to maximum heat might seem like a time-saver, but it transforms tender brisket into expensive shoe leather. High temperatures cook the meat further instead of gently warming it.
The most frequent reheating errors include:
- Setting temperatures above 325°F
- Skipping the moisture barrier (foil or lid)
- Reheating from refrigerator-cold
- Using microwave power levels above 50%
- Ignoring resting time after reheating
Pulling meat straight from the cooler and blasting it with heat creates uneven temperatures. The edges dry out while the center stays cold. Professional caterers allow proteins to sit at room temperature for 30 minutes before reheating begins.
The microwave deserves special mention for its talent at turning pulled pork into rubber. It heats unevenly and strips moisture faster than a desert wind. If circumstances demand microwave use, low power settings and covered containers become non-negotiable.
| Mistake | Result | Fix |
|---|---|---|
| Too hot, too fast | Dried edges, tough texture | 250-300°F max |
| No moisture added | Meat turns to jerky | Add broth or au jus |
| Uncovered reheating | Surface becomes crusty | Wrap tightly in foil |
Forgetting to account for carryover cooking catches even experienced hosts off guard. Meat continues cooking after removal from heat. Pulling items from the oven 5-10 degrees below target temperature prevents overshooting the mark.
Each mistake compounds the others. Dry meat becomes drier, tough becomes tougher, and guests remember the meal for wrong reasons entirely.
Choosing Between Whole and Sliced Formats
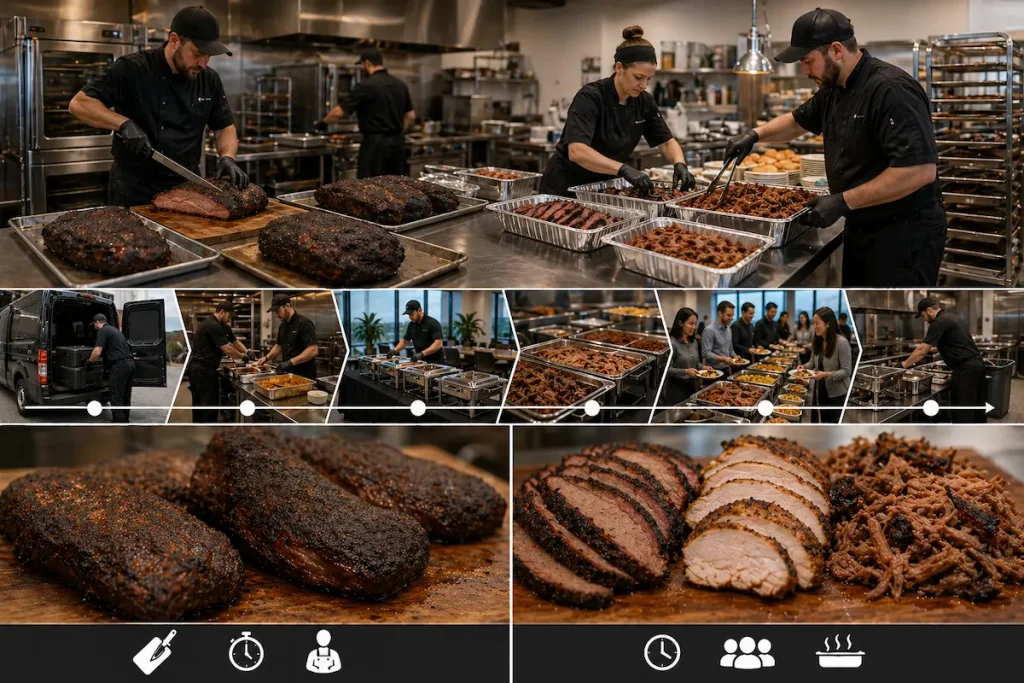
The decision between whole and sliced meats affects timing, presentation, and guest experience. Most caterers present brisket and turkey breast sliced, while pulled pork and ribs arrive ready to serve.
Whole briskets keep their moisture longer during transport and holding periods. They look impressive on a carving station. The downside? Someone needs to slice them on-site, which adds 15-20 minutes to setup time.
Pre-sliced meats offer convenience and consistency. Every guest gets uniform portions. The catering team can focus on other tasks instead of manning a carving board.
Format Considerations:
| Format | Best For | Drawbacks |
|---|---|---|
| Whole | Extended events, carving stations, visual impact | Requires skilled carver, extra time, specialized equipment |
| Sliced | Quick service, buffet lines, predictable portions | Less dramatic, can dry out faster |
Temperature control matters more with sliced meats. They lose heat quickly because of increased surface area. Quality caterers use chafers with water pans to maintain moisture and warmth.
The guest count influences this choice too. Events under 50 people benefit from whole presentations. Larger gatherings need the efficiency of pre-sliced proteins.
Some caterers split the difference. They slice three-quarters of the meat beforehand and leave one whole piece for show. This approach balances practicality with pizzazz.
Oven Techniques for Optimal Texture
The oven becomes a precision instrument when catering day arrives. Temperature control separates mediocre barbecue from exceptional fare.
Pre-heating matters more than most realize. A properly heated oven creates consistent heat zones that lock in moisture while developing crusty exteriors. Professional caterers set their ovens 25°F higher than target temperature, then adjust down once product enters.
| Technique | Temperature | Purpose |
|---|---|---|
| Low and Slow | 225-250°F | Breaks down connective tissue |
| Medium Roast | 325-350°F | Renders fat, maintains moisture |
| High Finish | 400-425°F | Creates bark and crust |
Rotation schedules prevent uneven cooking. Meat & Greet BBQ Catering rotates all pans every 45 minutes, regardless of oven quality. Hot spots exist in every unit.
Water pans placed on lower racks create humidity that keeps proteins from drying out during extended cooking times. This simple addition transforms texture from sawdust to succulent.
Resting periods post-oven are non-negotiable. Proteins need 15-30 minutes under loose foil to redistribute juices. Rushing this step wastes hours of careful temperature management.
The finishing phase often determines texture success. Quick blasts at high heat crisp exteriors without overcooking interiors. Some caterers call this cheating, but results speak louder than purists.
Probe thermometers tell the truth when eyes deceive. Insert at the thickest point, avoiding bone contact. Internal temperature dictates doneness more accurately than timers or appearance.
Using Sous Vide for Consistent Results
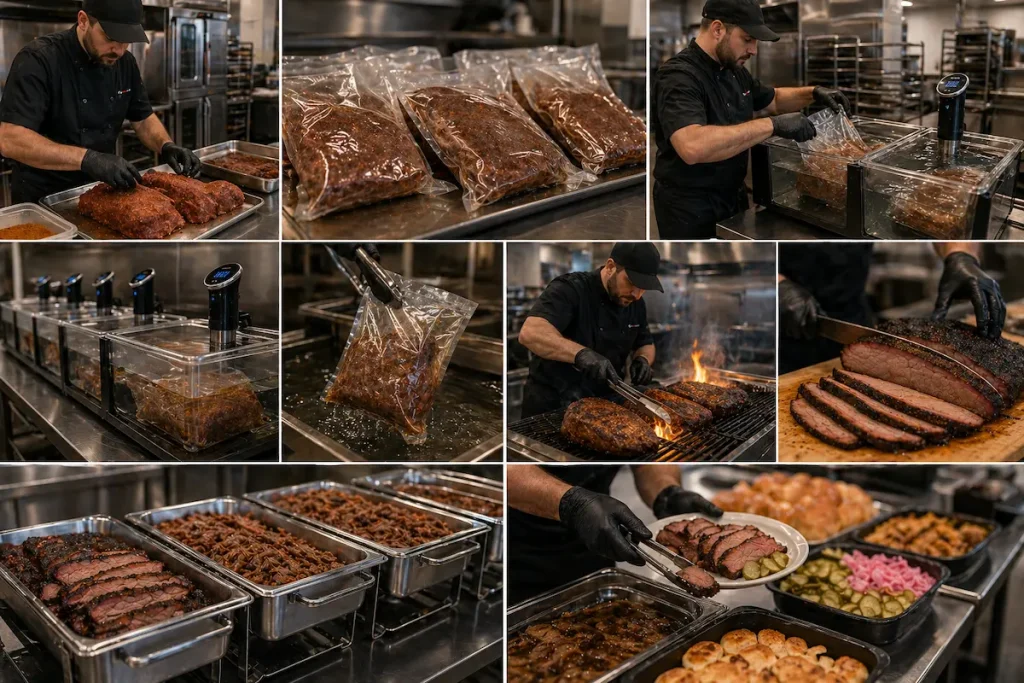
Sous vide transforms the chaos of catering day into a predictable science. The method involves sealing proteins in vacuum bags and cooking them in temperature-controlled water baths. This eliminates the guesswork that plagues traditional barbecue timing.
Key advantages for catering operations:
- Precision: Every brisket reaches exactly 165°F throughout
- Flexibility: Proteins hold at serving temperature for hours without quality loss
- Volume: Multiple bags cook simultaneously in a single bath
- Recovery: No panic when unexpected delays occur
The caterer preps proteins the night before, seasoning and bagging each portion individually. Bath temperatures get set based on desired doneness—typically 155°F for pork shoulder or 135°F for tri-tip. Bags drop into the water around 4 AM for a noon service.
The beauty lies in what doesn’t happen. No flare-ups require attention. No rotating of meat to prevent hot spots. No anxiety about over-smoking during extended holds.
Around 10 AM, proteins emerge perfectly cooked edge to edge. A quick sear on the grill adds char and bark while developing those essential smoke rings. The finishing step takes mere minutes instead of anxious hours of temperature monitoring.
| Traditional Method | Sous Vide Method |
|---|---|
| 12-16 hour cook time | 6-8 hour cook time |
| Constant monitoring | Set and forget |
| 15-20% waste from overcooking | Under 5% waste |
This approach frees the catering team to focus on sides, setup, and presentation rather than babysitting smokers.
Reviving Bark With a Skillet Finish
The bark on smoked brisket can soften during transport. This happens because moisture builds up in sealed containers.
A quick skillet treatment brings back that prized texture. Heat a cast-iron pan over medium-high heat until it starts to smoke slightly. No oil is needed since the brisket already contains enough fat.
The Process:
- Place brisket slices bark-side down in the hot pan
- Press gently with a spatula for 45-60 seconds
- Listen for the sizzle that signals proper contact
- Remove immediately when edges darken
The goal is to crisp the exterior without cooking the meat further. Internal temperature should remain unchanged.
| Timing | Visual Cue | Action |
|---|---|---|
| 0-15 seconds | Meat makes contact | Apply light pressure |
| 15-45 seconds | Fat begins rendering | Hold steady |
| 45-60 seconds | Bark darkens and crisps | Remove from heat |
This technique works best with room-temperature meat. Cold brisket straight from the cooler won’t crisp properly before the interior warms too much.
Watch for these signs:
- Too hot: Bark blackens in under 30 seconds
- Perfect: Golden-brown crust forms while interior stays tender
- Too cool: No sizzle after 10 seconds of contact
The difference is remarkable. Guests notice the textural contrast between the crispy bark and the moist interior. That crunch elevates the entire experience.
Microwave Use: Pitfalls and Precautions
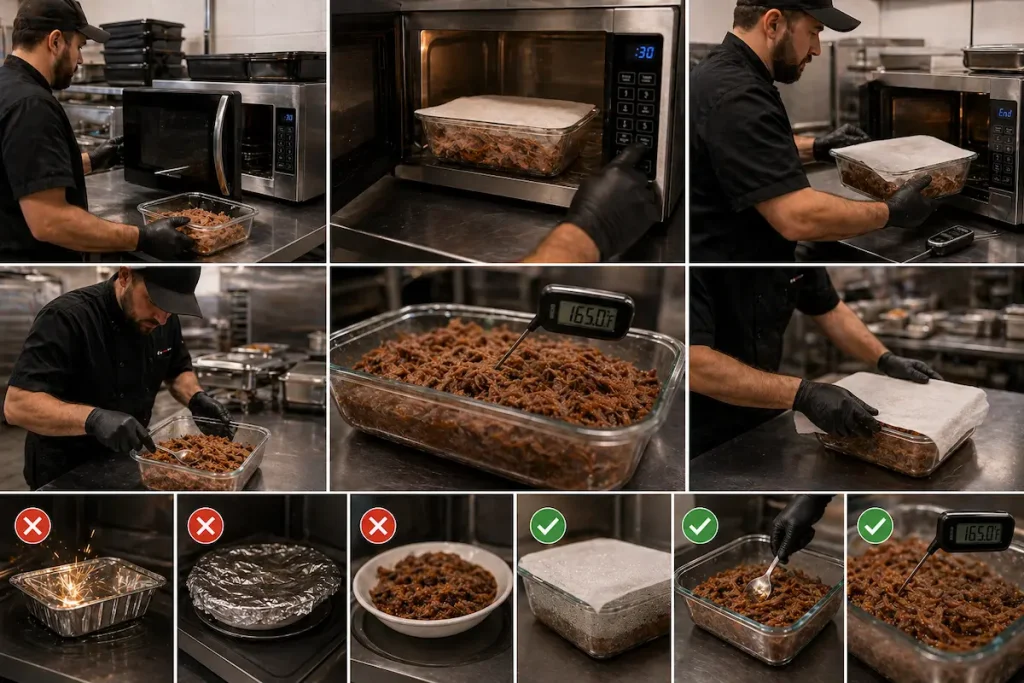
Most caterers avoid microwaves on event day, but sometimes they’re the only heat source available at a venue. The reality is that microwaves create hot spots and cold zones in food, which means uneven heating and potentially unsafe serving temperatures.
Metal containers and aluminum foil must stay out of microwaves entirely. They spark, damage the unit, and create fire hazards that no caterer wants to explain to a venue manager.
BBQ proteins lose their carefully developed bark and texture when microwaved. The meat steams instead of staying firm, and sauces can bubble over into a sticky mess that’s difficult to clean mid-service.
When microwaves are unavoidable, follow these guidelines:
- Use microwave-safe containers only
- Heat in 30-second intervals, stirring between each
- Check internal temperatures with a probe thermometer
- Cover food with a damp paper towel to prevent drying
- Never heat for more than 2 minutes without checking
The biggest mistake is trusting the “reheat” setting. These automatic functions don’t account for dense BBQ meats or thick sauces. Manual control prevents overheating edges while centers remain cold.
Professional caterers plan their heating strategy days before the event. Chafing dishes, warming ovens, and proper holding equipment eliminate microwave dependency. When a venue insists microwaves are the primary option, it’s worth bringing portable equipment instead.
Smart timing matters more than the appliance. Food that arrives at proper temperature needs only to be maintained, not reheated in desperation.
Selecting Effective Moisture Additions
The right moisture additions keep smoked meats from drying out during transport and service. Professional caterers rely on strategic liquid choices rather than random sprays or dunks.
Apple juice works beautifully with pork, adding subtle sweetness without overpowering the smoke. Beef stock amplifies brisket‘s natural flavors while maintaining its savory profile. White grape juice serves as a neutral option that won’t alter meat color or taste significantly.
Key Moisture Addition Options:
| Liquid | Best For | Flavor Impact |
|---|---|---|
| Apple juice | Pulled pork, ribs | Mild sweet |
| Beef stock | Brisket, beef ribs | Savory depth |
| White grape juice | Chicken, turkey | Neutral |
| Beer | Sausages, brisket | Malty notes |
Temperature matters when adding moisture. Warm liquids integrate better than cold ones, which can shock the meat and tighten fibers.
The timing of application determines success. Adding liquid during the initial wrap preserves bark texture. Late-stage additions risk turning crispy surfaces soggy.
Many caterers prepare their moisture blends hours before service. This allows flavors to marry and ensures proper temperature when needed. Some add a splash of the meat’s own rendered fat for extra richness.
The amount applied requires precision. Too little provides no benefit. Too much creates steamed meat instead of properly smoked barbecue.
A light coating serves most purposes. The meat should glisten but never pool liquid in the bottom of the pan.
Best Practices for Reheating From Frozen
Frozen catered BBQ requires careful handling to preserve the quality that went into every dish. The key is low and slow, just like the original cook.
Oven Method (Recommended)
Preheat to 275°F. Place frozen meats in a covered pan with a splash of apple juice or broth to maintain moisture. Heat until the internal temperature reaches 165°F, typically 45-60 minutes per pound.
Never use high heat. It dries out the meat faster than a Texas summer.
Water Bath Technique
For vacuum-sealed portions, submerge the frozen package in cold water. Change the water every 30 minutes until thawed. Then reheat in a 250°F oven for 20-30 minutes.
Microwave (Emergency Only)
Use 50% power in short bursts. Add liquid and cover the container. Check every 2 minutes and rotate for even heating.
This method works in a pinch but sacrifices texture and moisture. The oven always wins.
Critical Guidelines
| Do | Don’t |
|---|---|
| Add liquid before reheating | Rush with high temperatures |
| Cover dishes tightly | Reheat more than once |
| Use a meat thermometer | Thaw at room temperature |
| Plan 1-2 hours ahead | Microwave without liquid |
Sides reheat faster than proteins. Start checking them after 20 minutes at 300°F. Mac and cheese benefits from a splash of cream before warming.
Professional caterers freeze items at peak freshness. Proper reheating simply brings that quality back to life without compromise.
Strategies for Crowd-Ready Service
A solid catering checklist keeps service running smoothly when guests arrive hungry. The team sets up stations in zones based on flow patterns, not just available space.
Buffer lines work better than single-file queues. Multiple serving points prevent bottlenecks, especially at weddings where 150 guests need feeding within a tight window.
Smart caterers prep backup pans before service starts. When the brisket runs low on one station, a fresh pan slides in without missing a beat.
Wedding catering checklist items should include:
- Staged refills: Hot dishes ready in warming ovens
- Server positions: One person per 25-30 guests for buffet service
- Beverage stations: Separate from food lines to reduce congestion
- Dietary accommodation: Clearly labeled alternatives
Temperature matters more than presentation during peak service. Gorgeous platters mean nothing if the ribs hit the table lukewarm.
The best crews work in rotation. One server stays on the line while another monitors supplies and brings reinforcements from the kitchen.
Timing the meal release prevents chaos. Guests shouldn’t rush the buffet like Black Friday shoppers. Tables get called in groups, maintaining both dignity and order.
Smart layout places utensils at the end of the line, not the beginning. Guests juggle enough without carrying forks for three minutes.
The difference between adequate service and exceptional service shows in these details. Crowds get fed either way, but one approach leaves guests impressed while the other just leaves them full.
Pitmaster Tips and BBQ Community Hacks
Experienced pitmasters swear by the water pan trick. A shallow pan of apple juice or beer placed under the meat keeps everything moist while adding subtle flavor notes that guests notice but can’t quite name.
The reverse sear method works wonders for large cuts. Smoke the meat low and slow until it hits 10 degrees below target temperature, then crank the heat for a perfect crust. This technique prevents the dreaded dry edges that plague rushed cooking.
Essential hacks from the BBQ circuit:
- Use unwaxed dental floss to slice brisket cleanly without tearing
- Wrap probe thermometers in foil at the insertion point to prevent false readings from ambient heat
- Keep a spray bottle of 50/50 apple cider vinegar and water for moisture control
- Place a butter pat under the skin of whole chickens before smoking
The Texas Crutch remains controversial but effective. Wrapping meat in butcher paper or foil during the stall speeds cooking without sacrificing bark quality. Butcher paper breathes better than foil and maintains texture.
Most professionals refrigerate smoked meats overnight before reheating for events. This counterintuitive move allows flavors to penetrate deeper and makes slicing dramatically easier. Cold brisket cuts like butter compared to hot meat that shreds.
The community learned long ago that cheap meat plus proper technique beats expensive cuts with poor execution. A well-smoked pork shoulder outshines a mishandled ribeye every time.
Comparison Matrix of Reheating Methods
Different reheating methods produce vastly different results with catered BBQ. The choice depends on equipment availability, food quantity, and desired quality outcomes.
| Method | Best For | Temperature | Time Required | Quality Result |
|---|---|---|---|---|
| Oven (Low & Slow) | Brisket, pulled pork, ribs | 225-250°F | 45-90 minutes | Excellent – maintains moisture |
| Steam Table | All meats, holding service | 140-165°F | Continuous | Good – prevents drying during service |
| Chafing Dishes | Sliced meats, sauced items | Indirect heat | 2-4 hours | Fair to Good – requires liquid base |
| Microwave | Individual portions only | Medium power | 2-3 minutes | Poor – creates hot spots |
| Grill Finishing | Chicken, sausages, ribs | Medium heat | 5-10 minutes | Excellent – adds char |
Professional caterers avoid microwaves for bulk reheating. The uneven heat distribution ruins texture and creates rubber-like meat that disappoints guests.
Steam tables work brilliantly for maintaining temperature during service hours. They keep food in the safe zone without overcooking. Add a small amount of apple juice or beef stock to the pan for humidity control.
Oven reheating remains the gold standard for quality. Wrap proteins tightly in foil with a splash of liquid. The gentle heat penetrates evenly without sacrificing the bark or creating dry edges.
Chafing dishes serve well for sauced items like burnt ends or pulled chicken. The water bath provides consistent indirect warmth. Just remember that direct flame contact with pans causes scorching.
Essential Guidelines for Brisket Reheating
Brisket demands respect, especially when it comes to reheating. The difference between tender, juicy meat and a dried-out disaster often comes down to technique.
The Golden Rules
Temperature matters more than speed. Aim for a gentle 225°F in the oven, never rushing the process. Wrap the brisket tightly in foil with a splash of beef broth or reserved juices to create a steamy environment that prevents moisture loss.
Time varies by thickness, but most briskets need 45-60 minutes. A meat thermometer becomes essential here—the internal temperature should reach 165°F without exceeding it.
Method Comparison
| Method | Time | Quality Result |
|---|---|---|
| Oven (225°F) | 45-60 min | Excellent |
| Smoker | 60-90 min | Outstanding |
| Microwave | 3-5 min | Poor (emergency only) |
Critical Steps
- Slice only after reheating, not before
- Keep the fat cap intact during warming
- Let it rest for 10 minutes post-reheat
The smoker provides the best results for those with time. It reintroduces that subtle smoke flavor while maintaining moisture levels. However, the oven works perfectly fine for most catering situations.
Never microwave unless facing an absolute emergency. The uneven heating creates hot spots while leaving other sections cold, and the texture suffers dramatically.
Professional caterers know that proper reheating separates memorable events from mediocre ones. The meat already survived smoking, resting, and transport—don’t ruin it in the final stretch.
Frequently Asked Questions
Catering day raises common questions about timing, logistics, and service. These answers cover everything from initial arrival to final breakdown, including food safety, setup variations, and booking timelines.
What is the typical sequence of activities on the day of a catered event?
The catering team arrives first to unload equipment and conduct a venue walkthrough. Setup follows, including tables, linens, food stations, and beverage areas. The kitchen team begins final food preparation while front-of-house staff arranges serviceware.
Guest arrival marks the transition to active service mode. Appetizers or cocktail stations open first, followed by the main meal service. The team monitors food temperatures and replenishes items throughout the event.
Breakdown starts once guests finish dining and begins mingling elsewhere. Staff clears tables, packs equipment, and restores the venue to its original condition.
When does the catering team usually arrive for setup, and what happens first?
Most catering teams arrive three to four hours before guest arrival for standard events. Wedding catering often requires five to six hours for complex setups. The first task involves unloading trucks and staging equipment in designated prep areas.
A venue walkthrough confirms table placements, electrical access, and any last-minute layout changes. The BEO serves as the reference document during this initial phase. Team leads assign stations and responsibilities based on the finalized catering timeline.
How is food prepared, transported, and kept at safe serving temperatures on event day?
Proteins receive final smoking or grilling at the venue when possible to maintain peak flavor and texture. Items prepared off-site travel in insulated cambros that hold temperatures above 140°F. Cold items stay in refrigerated units at 40°F or below.
Chafers with fuel cells maintain hot food temperatures at buffet stations. The team uses probe thermometers to verify safe temperatures every thirty minutes. Food rotation ensures guests receive fresh, properly heated dishes throughout service.
What does the catering setup process include for buffet, plated service, and stations?
Buffet setups require chafing dishes, serving utensils, and clear signage for each dish. The team arranges items in logical order, typically starting with proteins and moving through sides and accompaniments. Dietary restrictions receive separate stations or clearly marked alternatives on the wedding menu.
Plated service demands precise timing coordination between kitchen and serving staff. Place settings go down first, followed by water service and bread if included. Servers deliver courses simultaneously to tables in assigned sections.
Food stations create interactive experiences with dedicated staff managing each area. Carving stations need cutting boards, carving sets, and appropriate garnishes. Build-your-own stations require organized ingredient displays and clear instructions.
How does staffing and service flow work during guest arrival, meal service, and breakdown?
Staff positions themselves at assigned stations fifteen minutes before the first guest arrives. Greeters direct attendees toward cocktail areas or appetizer stations. Bartenders and passed-hors-d’oeuvre servers circulate among guests.
The catering event timeline dictates meal service start based on program schedules or host signals. Buffet lines open with staff explaining dishes and accommodating dietary requirements. Plated service follows a choreographed sequence with courses timed to event flow.
Breakdown crews work discretely, removing items from vacated areas without disrupting remaining guests. The process accelerates once the event officially concludes, with teams packing according to pre-assigned zones.
How far in advance should a catering order be placed to secure the date and finalize details?
Wedding catering bookings typically occur twelve to eighteen months before the event date. Popular dates during peak season require even earlier reservations. Corporate events and smaller gatherings need six to eight weeks minimum.
Initial deposits secure the date while menu planning continues. The final headcount and menu selections lock in one to two weeks before the event. Payment schedules usually include a deposit, second payment at the midpoint, and final balance three to five days prior.
Last-minute dietary restrictions can be accommodated up to seventy-two hours before service in most cases. Menu changes after final headcount confirmation may incur additional fees.